
 Sign In

Tutorial: Hemming a curved edge by machine

When I was a young sewist, I made a ton of circle skirts which, oddly enough, I learned to make from a Usenet newsgroup (I am old and a nerd). I wore them over brightly colored crinolines like a 90s goth version of Cyndi Lauper.
The one thing that always stuck in my craw about circle skirts was the hemming. Curved edges can be quite a pain to hem, because the raw edge that you fold under is bigger than the seamline. This can result in all kinds of twists and puckers.
One solution is to stitch your hems by hand. This is often my preference anyway, as I like a wide, invisible hem. But that can take a really long time, and sometimes you just want to let your machine do most of the work.
I’m going to show you my technique for hemming tricky curves with a sewing machine, and a couple tips I’ve picked up through the years.
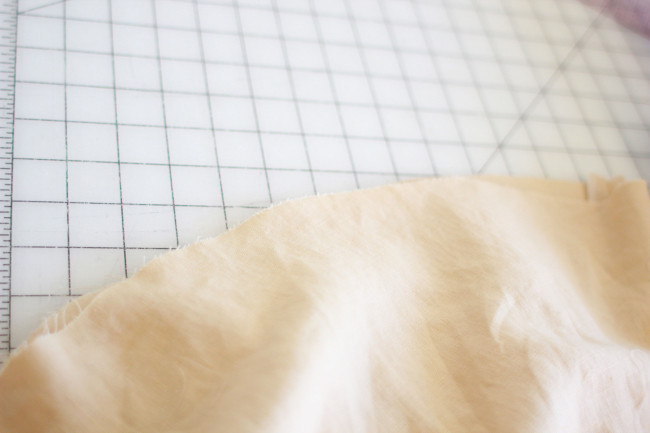
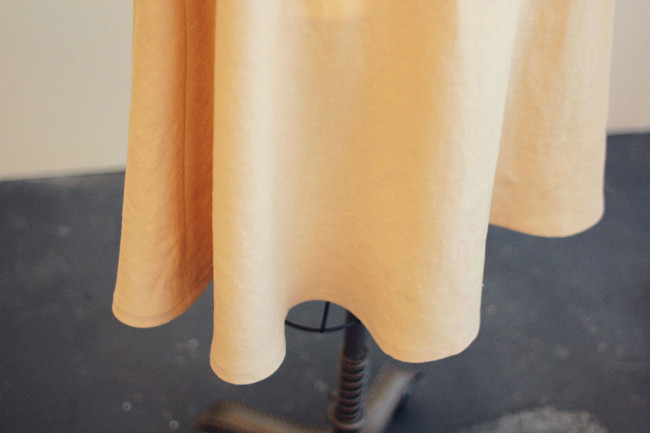
Here’s the raw edge of my hem. You can see it’s got a bit of curve to it. We’re going to be sewing a 5/8 inch hem.
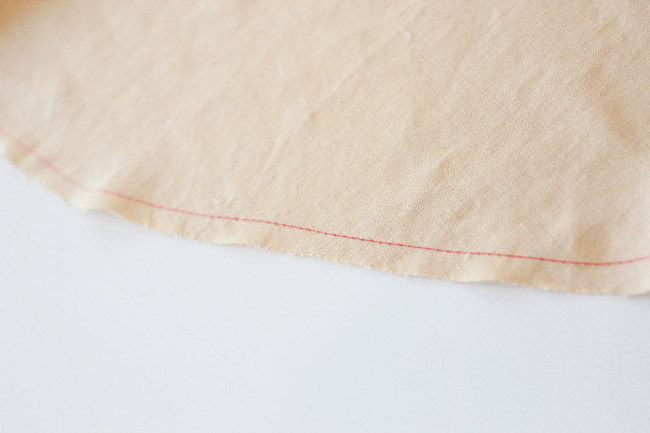
First, stitch a line of basting 1/4 inch from the raw edge, all the way around your hem. I used a red thread so you can see the basting clearly. I like to increase my thread tension just a bit when I do this.
The basting does three things:
- It measures and marks a precise 1/4 inch for you, so you don’t have to do a lot of tedious measuring and marking by hand.
- It forms an almost perforated line, making the hem easier to fold.
- It very slightly eases the edge in, making it a little tighter and easier to fold under twice. Increasing the thread tension just a bit helps with this.
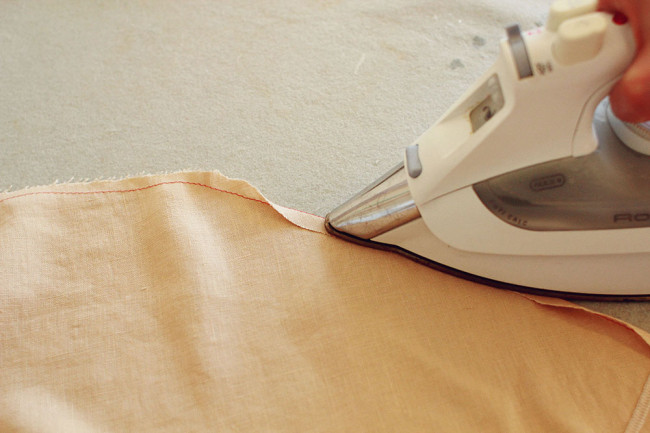
On the wrong side, turn along the basting and press. Holding it a little taut along the basting will help you fold the edge as you press. Use plenty of steam and press firmly (moving the iron up and down), don’t iron (pulling the iron side to side).

One your hem is pressed, turn again and press. The raw edge should be up against the bottom fold, within the hem.
You may be wondering: if we turned it over 1/4 inch, then turned 1/4 inch again, isn’t that only a 1/2 inch seam allowance?
Excellent point! But I find that the extra 1/8″ is usually taken up by the turn of cloth (that is, extra fabric that is taken up by forming the folds). If you use a very light fabric, this might not be the case. In that case, if you’re really into having a hem that’s exactly 5/8 inch, you could make your original basting 5/16 inch from the edge. I don’t imagine most of us would care that much.
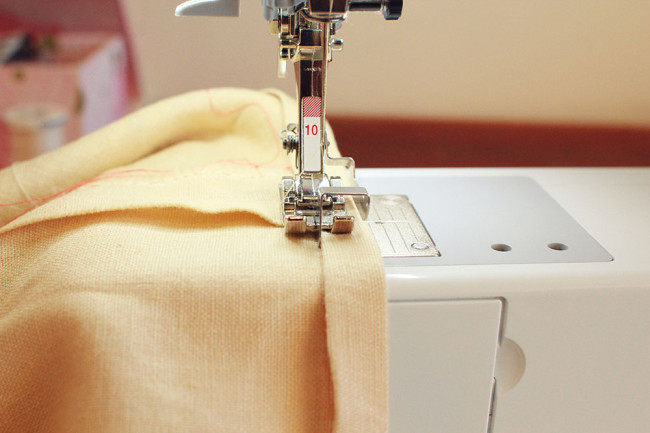
Now edgestitch along the fold on the inside of your skirt to form a perfect hem. If you have an edgestitching foot, I recommend using that.
Give your hem a final press and you are done!

Comments
annette tirette
June 13, 2013 #
Nice trick! I tend to use narrow bias tape on curved hems, the bias makes it easier to ease and gives the hem a nice drape.
Jennifer
June 13, 2013 #
I also use bias tape on curved hems. It does give the hem a nice drape, and if it’s done in a contrasting color or print you can fold it over only once and have a pretty accent piece.
Stephanie
June 13, 2013 #
I love the idea for marking the hem with basting stitches but you’d still have to do all of the tedious measuring so your garment would be all the same length (because of all of the stretch on the bias!) I love circle skirts but I hate doing all of that measuring!
Reader
June 13, 2013 #
Why are you apologizing for being a nerd and not a kid? Recently, there have been a lot of conferences and articles on the lack of progress women have made. This kind of undermining, somewhat anti-tech attitude is part of the problem. Women and girls are pressured not to take (or seem to take) anything too serious and god help them, not to appear “weird.” Unfortunately, I see this tone on a lot of sewing blogs.
Reader
June 13, 2013 #
Should have been “too seriously.”
Thanks for the tip. But again, it’s good to be a nerd. Most people who achieve things are very focused and some kind of nerd. There’s nothing wrong with that.
cris
June 13, 2013 #
I totally agree. Most interesting creations come from “nerds” :-)
Sarai
June 13, 2013 #
I don’t think I implied anything negative about either being old or a nerd. I love getting older (way happier than when I was in my twenties). And I happily embrace my nerdiness… which includes not just tech nerdiness and computer science but many other forms of geekery (science fiction, comics).
In fact, I’ve had a post brewing in my head for a long time about the similarities in various forms of geek cultures, including sewing/craft (which I think can get very, very geeky).
PS: Our community guidelines ask folks not to post anonymously. I don’t think you’re being rude, I just wanted to let you know.
Stacey
June 18, 2013 #
“Lack of progress” comes from hiding under a rock. Lack of progress comes from not owning our own success and underestimating our abilities. Lack of progress comes from crouching behind anonymity. This platform, the conversations, the patterns and creativity testify to, as my daughter would say, “ownage.” (Plus, I take issue with this notion of weirdness/nerdiness somehow being implicated in a mention of women’s “progress.” Seems dissonant to me. ) I agree with Sarah: mention of nerd-hood is validation and ownership of said nerd-hood!
Sarai, would love to see a posting of geek cultures and the cross-pollination therein.
Great tip for hemming. Thanks!
Laurie
November 16, 2013 #
You think you’re an old nerd…? Usenet…? I remember programming with punch cards!
Sarah
June 13, 2013 #
I read it as claiming her nerd-hood and owning up to it rather than apologizing. Sarai used to work for Google/YouTube for goodness sake, I really don’t think she could rightfully be called anti-tech…
Lacey
June 17, 2013 #
Agreed. The comment makes a reference to having knowledge others might not have, not an apology. I’m in my early 30’s (not too young) but still didn’t understand the “usenet” reference, so I appreciate the point.
Louise
June 13, 2013 #
How wonderful! This looks like a really smart trick and just in time to save my bacon, too. I’ve just chopped up an old tablecloth to make my first circle skirt!
Sewing Princess
June 13, 2013 #
Very interesting to see you use the edgestitch foot from the inside. It certainly takes away the guessing I normally do from the outside. I never used that trick as I was afraid the outside wouldn’t look as nice.
Teresa
June 13, 2013 #
Kenneth King shared an idea that I have been loving! On the right side of your fabric, sew the seam as Sarai shared, but he uses adding machine tape on top. Then you can hold onto the paper as you turn it twice and press. Using a short stitch perforates the paper to make it easy to remove.
Sarai
June 13, 2013 #
Nice!
Lisa G.
June 13, 2013 #
This is very welcome – thank you!
April
June 13, 2013 #
Sorry to be dense, but I’m not understanding the edgestitching at the very end. Is it like a blind hem stitch? I can’t tell from the pics if the final line of hem stitching is “invisible” like a blind hem or just fading into the cloth from a good thread match.
Thanks for the tutorial and any help! I’d love to try this technique.
Sarai
June 13, 2013 #
No, it’s visible from the outside. I use the edgestitch because it makes the inside look very neat and tidy and even.
Stephanie
June 13, 2013 #
Very nice! I thought that I basted an excessive amount, but it seems like that’s quite normal! It’s a really useful technique.
Ah, the number 10 foot. I love that thing.
Jen
June 13, 2013 #
This is exactly how my grandmother and mother taught me to do a hem – not just for a true circle skirt but any kind of modified circle, too. The basting is definitely the secret to getting it even and for bringing in that ease. I machine baste even if I sew the finished hem by hand, just to make it easier.
Barbara Stone
June 13, 2013 #
Very nice looking hem…and I have to say I prefer a small topstitched hem on a circle skirt. I do like a deep hem if the fabric is sheer but you have to make that hem perfect because it shows!
Ashley at The Feisty Redhead
June 13, 2013 #
So funny that you posted this today, as I just resurrected a circle skirt that I never finished from about 8 years ago! I think pinning the hem is almost as annoying as sewing the hem. I felt like the pinning went on. And on. And on.
ShanniLoves
June 13, 2013 #
I’ve always been scared of circle skirts because of the hem. Thanks for this post! I shall now give it a try.
Claire
June 13, 2013 #
Dang, that’s brilliant! I wish I knew that when I finished the hem of my dress yesterday. Should make my like much easier now! Thank you for sharing!
April
June 13, 2013 #
Thank you for this! I love circle skirts but have such a hard time with the hem so I’m excited to try it again using these tips!
Julieanne
June 13, 2013 #
Thanks for the tip Sarai. I seem to have developed a fear of circle skirts for this exact reason (I hate hemming normally and also the obscene amount of fabric that would be required to make one my size! ;) ) At least now I don’t need to worry about one of the reasons. I love the thread tracing measuring idea.
Shona
June 13, 2013 #
Thank you thank you thank you!!!!! I’ve always hated hemming circle skirts and never could figure out the right method for easing in that extra fabric. I’ve tried all kinds of things! Lately I’ve been serging the edge and then using that as a guide to turn it under twice for a narrow hem. The serged edge acts sort of like the basting here, makes it easier to press under. I’m going to give this a try next time!
Katherine
June 13, 2013 #
Thank-you for this method.
Another method that works well if you have an overlocker, is to overlock the bottom edge, allowing the overlocking to ease it in a little (if you have set you overlocker to have the right tension on a double layer, often it will ease the fabric in a little when you are overlocking a single layer). Then it is easy to press up the hem without any obvious gathering or lumpy tucks.
Neeno – Sew Me Love
June 13, 2013 #
Excellent tutorial!!
I have hemmed a circle skirt twice. First job was very dody and not worth mentioning!! Second time I serged the hem (as I didn’t have much SA to play with at the hem) I then used the iron to press it down, them did a narrow hem on the sewing machine (http://www.sewmelove.com/2012/11/finished-project-handmade-floral-skinny.html)
I love this tutorial though, it gives it a clean finish inside and out!
kelly
June 13, 2013 #
awesome! i am new sewist so having this trick available will come in handy when i try my FIRST circle shirt! :)
cynthia gehin
June 13, 2013 #
This really works! Have been using a similar method that I ‘devised’ years ago but this tutorial really helped!
Jacqui
June 13, 2013 #
That’s really interesting – I’ve used the basting technique before but increased the stitch length to make it more of a gathering stitch, which you can then use to ease in the fullness. It’s interesting that you get the same effect with a shortened stitch! I must give it a go :)
Sarai
June 14, 2013 #
I actually always use a long stitch length for basting! Makes it easier to rip out.
Adrienne
June 14, 2013 #
Wonderful tip! I alwasy dread hemming curved edges, but this sounds like it will make my life easier.
Mara
June 14, 2013 #
Genius! Thank you, I will definitely try this for my next circle skirt. It’s been maddening trying to iron the curved hem consistently without the thread guide.
Abi
June 15, 2013 #
This is fantastic! I make and wear lots of circle and half circle skirts, and yes, hemming has always been the bane of my sewing. I used to use bias tape, which I found gave the hem a bit of weight which was great for heavier fabrics, but not for light ones. These days I do a narrow rolled hem on my overlocker. It’s a really neat finish and you can also play with contrast colours too. Though it does mean you have absolutely no allowance to play with.
Abigail
June 15, 2013 #
Thank you — this tutorial is great! I hemmed my first circle skirt recently and found the whole process so frustrating. Looking at this though, I’m ready to give circle skirts another chance.
Tiphaine
June 16, 2013 #
Hey Sarai,
I was looking carefully at the photography and I have a question: the foot you are using has this metallic limit size to direct the fabric and being regular I guess. I have never seen that before. Can you regulate the distance of it ??
I hope I am clear enough !!!
Thanks Sarai.
Sarai
June 17, 2013 #
Yes, that is my edgestitch foot, which is extremely useful for getting an even stitching line close to the edge! The vertical plate that holds the fabric stays in place, but you can move the needle side to side to change the distance from the edge.
Miss Piggy
June 16, 2013 #
Lovely skirt. I don’t suppose you have a link to a pattern for a circle skirt. It “may” be a good project to kick off my sewing with.
Ginderella
June 17, 2013 #
I’m going to do this on my next circle skirt. I make and wear a lot of them and have used a rolled hem foot in the past, but I really like the look of this method.
Lady ID
June 17, 2013 #
Great tip. I tend to use a rolled hem but I will try this. I make a lot of circle style skirts so I know the opportunity will come up soon:)
rbjaneite
June 17, 2013 #
I have just cut a circle skirt that has been hanging for *ahem* many months. It’s always good to let the bias drop as much as it possibly can, isn’t it! On this particular one I’m going to face the hem with bias tape (it’s a thickish wool), but I think I’ll use your method next time I make a lighter one.
I made myself a grey circle skirt in my teens and wore it most winter Sundays – I could sit with one side of the fullness doubled over my knees, and still have the other side to spread over my little sister’s lap to keep the draughts away at church! So practical. I loved it.
Yoshi
January 7, 2014 #
Aww, that’s so sweet about helping to keep your little sister warm. :-)
Susan
June 19, 2013 #
I have to say that I absolutely love your patterns. I started sewing later in life and I found that
I didn’t like the patterns much, they weren’t me.
I always like something different and loved the 50s and 60s style, my generation was the 70s
unfortunately.
Your patterns have that feminine look and I love them.
Thank you so much for the inspiration, I haven’t stopped sewing since I found you’re patterns.
Best Wishes
Sue Bingham.
Susan Bingham
Donna
June 19, 2013 #
This will come in handy for the new Hawthorne, won’t it? LOL
Jane
June 28, 2013 #
Thanks for such a clear tutorial. I have just purchased Hawthorne so perfect timing.
Please keep these great tips coming.
Judith
July 5, 2013 #
Thank you so much for this tutorial!! I have been catch-stitching my circle skirts by hand. I had one particular voluminous circle skirt that took several days of hand sewing before I was satisfied with the results.
Rachel
October 9, 2013 #
Thanks for the tutorial. I’m a new sewer and I ran into a problem when doing the basting stitch at the beginning. I’m trying to take an A-line dress and hem it into a tank top. I tried the basting stitch 1/4” from my cut edge three times- the first time, by changing only the stitch length dial (from 2.5 to 6, then down to 5.5), then by keeping the stitch length at 5.5 and adjusting the thread tension from 4 to 5.5. All three times, the stitching was even but the fabric gathered quite a lot. It didn’t seem realistic to smooth it all out afterward, and your instructions didn’t seem to indicate that would be necessary. What am I missing? The edge doesn’t seem outrageously curvy to me. Thanks to anyone who can offer help. I use a Husqvarna Viking Daisy.
Sarai
October 9, 2013 #
I find that it sometimes helps to hold my fabric a bit taut while doing basting with a long stitch length, to prevent the gathering of fabric. It does depend a bit on the type of fabric you’re using. Stable fabrics will have less tendency to gather up like that.
Rachel
October 20, 2013 #
Thanks- holding it somewhat taut (one hand behind the presser foot, one hand in front) helped a lot.
lauren
February 5, 2014 #
I do not have an edge stitch foot, can i just use a regular foot and straight stitch?
Jenni
April 15, 2014 #
Thanks for the tip! I am sewing my first curved hem (a half circle skirt) right now and this will help a lot! When you say to increase the thread tension, are you increasing the bobbin tension as well? I just read about this in my sewing machine manual yesterday, and they said you have to keep both (bobbin and thread tension) balanced for even stitching. Do you want the top thread to have more tension than the bottom thread for the purpose of easing the curve, or do you still want it balanced? Thanks! :)