
 Sign In

Tutorial: How to make bias tape (piecing method)
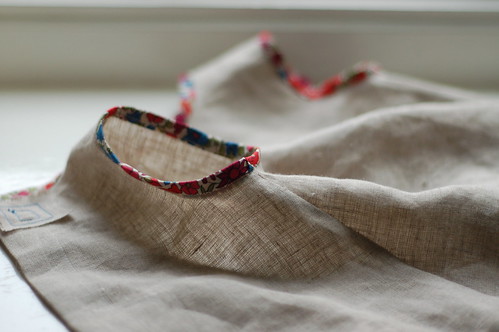
{photo of liberty bias trim by poshyarns}
ETA: Also check out the continuous loop bias tape method for a faster method (it’s just slightly trickier the first time).
As I mentioned recently, I think bias tape is wonderful stuff. It’s a terrific help if you can learn to make it yourself. Yes, it’s a bit time consuming, but the possibilities are pretty endless for prints and patterns, it’s less expensive, and best of all as far as I’m concerned, you can make tape to match your fabric!
If you’re not really familiar with bias tape, it’s basically a long strip of fabric that’s been cut on the bias of fabric. Because it’s cut on the bias, it stretches, which makes it really easy to sew around curves and such. The strips of fabric are folded so that you can sew them to enclose seams neatly.
So here’s one method. Nothing novel, but I thought it might be handy.
ETA: We also have a tutorial for the continuous loop method, which is what we use. It’s nifty and fast.
You’ll need:
- a piece of fabric to use for your bias tape
- a Clover Bias Tape Maker. These come in various sizes, I find 1/2″ useful.
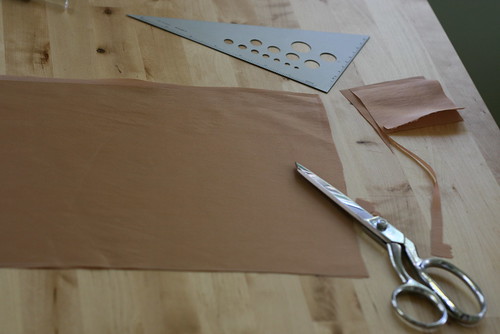
Step 1: Cut yourself a rectangle of fabric. How much tape will you get out of it, you ask? First, figure out how many square inches your rectangle is by multiplying the length by the width. Now divide that number by the width of the strips you’ll be cutting. That will give you a rough approximation (I say rough approximation, because you’ll probably discard the corners of your fabric).
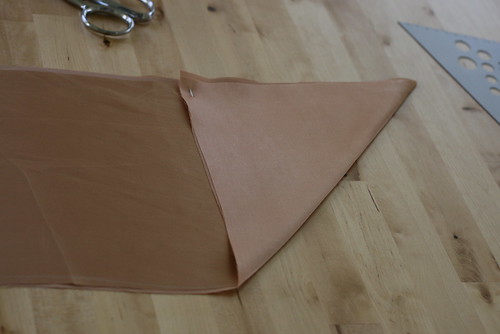
Step 2: Now you need to find the bias. To do this, simply fold the fabric so that the edges meet to form a triangle. Mark the fold (I did this by pressing it, so the pressed line is the bias grain).
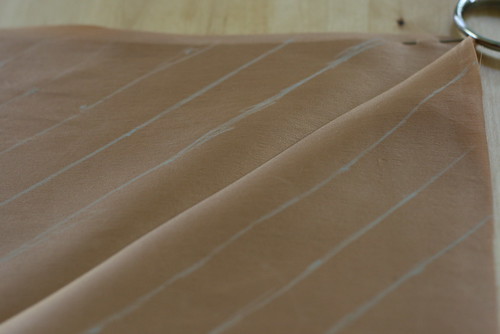
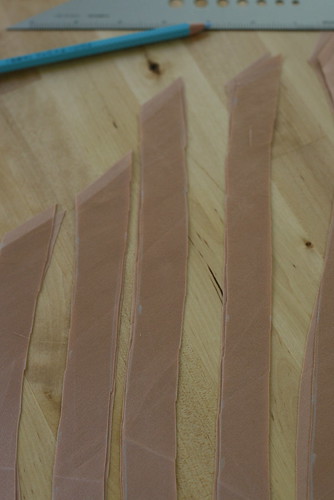
Step 3: Mark off strips along the bias by measuring equal distances from the line you marked. Your strips should be twice the width of your completed bias tape. So if you’re making 1/2″ tape, your strips should be 1″ wide. (I know, mine are a bit sloppy, but silk charmeuse is slippery. It’s easier on cotton or the like). As you get to the corners, your strips will become very short. It’s probably best to just discard the corners rather than worry about sewing all those tiny strips together.
Step 4: Now cut out your strips. You’ll notice that the strips are stretchy if you give them a tug.
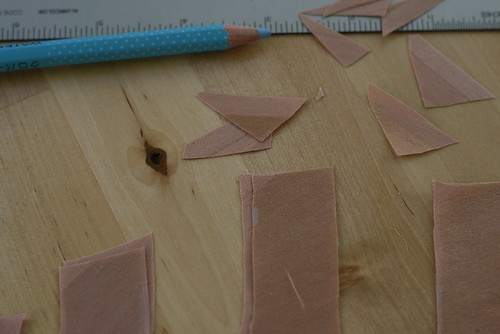
Step 5: Trim the ends of the strips so they’re flat.
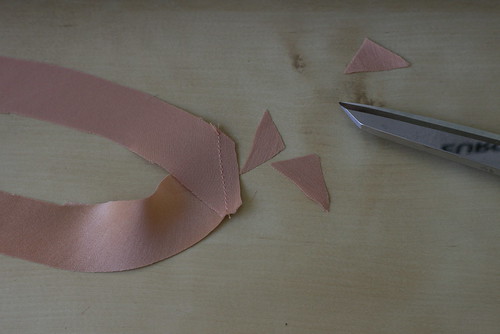
Step 6: Place two strips at 90 degree angles with the right sides together, lining up the edges. Sew diagonally across, as in the photo. Continue sewing all the little strips in this way to form one long strip. Make sure they each are sewn the same way, so that all your seams go in the same direction in the end.

Step 7: Trim the pointy little seam allowances on each seam.
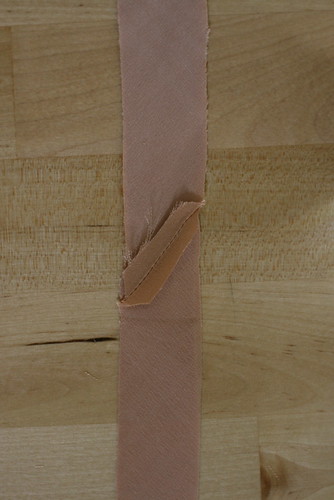
Step 8: Press the seams open.
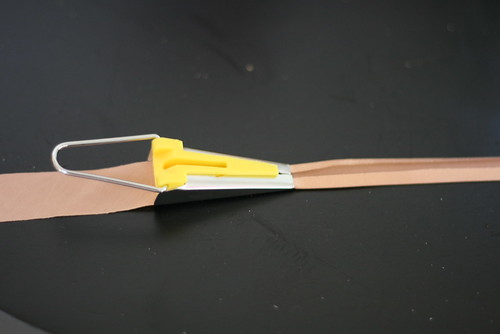
Step 9: Now to use the fun doohickey! Feed your strip evenly through the bias tape maker. There is a little metal bar you can gently pull on to help guide the tape. As it comes out the other end folded, press it down as you go.
And you have bias tape! This is single-fold bias tape. If you want double-fold bias tape, you just have to fold it in half again and press.

And here’s what your seams will look like from the outside. Diagonal and pretty and neat!

Comments
Alexandra
June 12, 2009 #
Perfect Tutorial! Usually I see bias binding how tos telling you to use a full yard or more of fabric, which if you ask me, is not entirely practical.
Oh how I love bias tape! So many uses, so little time.
Thanks and cheers.
Anna Allen
June 12, 2009 #
i didn’t know there was a bias tape maker! wow. and here i’ve been doing it the hard way all these years. thanks!
Liz
June 12, 2009 #
Great tutorial – I wish it had been around when I had to teach myself how to make the stuff.
I totally cheat when cutting and use my rotary cutter and ruler. Most quilting rulers have 45 degree angle marked and I just zip through the first cut after lining that up. After that, I just line up the edge and cut the desired widths without having to make marks.
Rotary cutters make it onto my short list of best inventions ever! :)
Evan
June 20, 2010 #
“Rotary cutters make it onto my short list of best inventions ever! :)”
I have to agree with this statement!
sushi pie
June 13, 2009 #
i love making my own bias tape and now I know what that little “thingamabob” is for! there was one in my grandmothers sewing supplies that i inherited and i had no idea what it was. woo hoo!
xoxo,
sp
Sarai
June 13, 2009 #
So glad this is helpful for you guys!
Liz, that’s a great method with the rotary cutter and ruler, I don’t know why I’ve never thought of that! I’m going to give it a shot next time.
Rabid
June 14, 2009 #
After making bias tape for a placemat all weekend, and trying to convince people it’s not hard, I run across a tutorial :D I’ll be linking it, assuredly.
It’s not that hard to make bias tape even w/o a bias tape maker. Fold in half lengthwise. Press. Open and fold edges to middle. Press. Tada :)
Christina Draper
October 1, 2011 #
It really isn’t hard to do it “the hard way”, but when you have to make a lot of bias, the bias tape makers are mind-blowing. I once stood at a table for six hours making bias tape “the hard way” because I was a newbie costume technician, and they gave all the newbies the crap jobs. I didn’t know bias tape makers existed until a few weeks ago. They made my whole week, and something that would’ve taken 45 minutes to complete took 15.
Yellie
June 15, 2009 #
Great tutorial and that little doo-hickey thingie is so neat!
Casey
June 17, 2009 #
Oh! I’m definitely going to buy one of those bias makers asap! I’ve been dying to get one for years, and now I have to. ;) hehe. Thank you so much for this tutorial. Now I have no excuse not to make bias tape. ;)
NoirGirl
June 19, 2009 #
Thanks so much for this lovely tutorial! It comes just at the right time, as I’m at the stage of my latest project where I need some bias tape to finish. :)
Jill Ison
June 21, 2009 #
oh my gosh I’ve been making bias tape without a doohickie all this time??? Oh I feel so dumb with my big ol iron trying to do it manually… off to the sewing store :) glad i came across your blog!
Sarai
June 22, 2009 #
So glad I could help turn some of you on to the magic of bias tape makers! They’re such a simple little tool, but such a time saver!
Julie
July 4, 2009 #
Thank you for the easy-to-follow tutorial. I lost my instructions for the doohicky and I’ve been wanting to try it out for a long time.
julie – eab designs
August 4, 2009 #
I needed a refresher in making bias tape and your tutorial was so helpful. I’m going tomorrow to purchase a bias tape maker – so much easier than turning under the edges on your own! Thanks much!
dot
September 5, 2009 #
Thanks for the info on the bias tape. It sure has helped and I plan to make your web site my regular on my desktop.
Tracy
September 14, 2009 #
Thanks so much for the reminder, I appreciate that you took the trouble to set it out. Now I am off to make some bias tape.
Merry Gregg
September 17, 2009 #
I’ve been making my own bias tape for years… that little “thingamabob” will help tremendously… save burnt finger tips (I have been ironing each side over all these years!)… ouch!
candace
September 26, 2009 #
http://creativelittledaisy.typepad.com/creative_little_daisy/2007/11/diy-version-of.html
this is how to make your own “bias tape maker” instead of having to purchase one…just in case anyone is broke like i am.
clf
October 27, 2009 #
this is a more efficient way to cut bias strip binding. it’s used by quilt makers (who have to cut a lot of binding!)
http://buzzville.typepad.com/buzzville/2006/03/cutting_continu.html
i have a clover thingee too, but i find that the binding sometimes comes out lopsided when it feeds out of the thing. i can’t seem to get it perfectly divided up. sometimes one side is thinner than the other
Sarai
October 27, 2009 #
clf, thanks for the tip, that’s a great link!
Mint Julep
December 11, 2009 #
Sarai,
LOVE your dresses! Here’s a tutorial you might like–there’s actually a much faster (and easier) way to make bias tape. Essentially, after you draw off the lines, you sew it into a tube, then cut and you have one long, continuous piece of bias tape. Brilliant! http://whipstitchlounge.blogspot.com/2009/03/ive-had-some-questions-about-how-to.html
Kay
December 28, 2009 #
Just to jump in the ring with another tip here, if you don’t have a bias tape maker, or if you do but you want to make double fold, you can use a ruler and a few pins nipped into your ironing board (just make sure the space in between the first nip and the second is the width you want your bias tape to be) run the tape under the pin and it will fold itself neatly, then run it under the iron. (It’s easier for me b/c I can set it up “assembly line” style, leaving the iron to sit and just pulling the tape underneath it. If you move fast enough, the iron will moderate it’s own temperature and then I don’t have to fuss with the iron or holding the tape maker down.)
Teresa
December 24, 2010 #
Kay–thanks for reminding me of this!
I think you can also sew an “X” onto your ironing board in the size you want and pass the bias under it. I think I remember doing this when we did not have the size bias tool we needed.
Bobbie
January 15, 2010 #
Great tutorial! I have been quilting for awhile but have never made my own bias tape. The directions were so clear and concise. I always say you can learn anything from the internet. Thanks!
Yasmeen
May 2, 2010 #
I need to invest in that bias tape maker. It looks a lot easier than my regular method of steaming my finger tips from my hot iron being too close. Thanks!
Krystal
June 11, 2010 #
Whoa, so excited to see this little bias tape maker! I thought my only option was one of those electric ones, and I didn’t want to drop $100.00 on one. This little guy has such a “stick it to the man” attitude to it (maybe I should have called it a little “gal” :). Inexpensive, efficient and has history behind it! I love it!
Jude
June 12, 2010 #
Your tutorial was awesome……so easy. Thank you!
Katherine
December 31, 2010 #
This tutorial is great! So easy to understand and makes the process so effortless. Thank you!
Krystle
January 2, 2011 #
Wow! Thanks for the tutorial!
Carol
February 8, 2011 #
I do my own bias all the time and this is the way I do it. Once all the strips have been cut, I take a long large needle and pin it on my ironing board and make a point on the bias strip and start it under the large needle and fold both edges and pull it through and as I pull it through, take the iron and start pressing both ends down. Once that step is done then I just fold in half and press together again .. little finger will not get burned either..
THAT IS IT… NO need to purchase a bias tape maker, waste of money…
Sarai
February 9, 2011 #
I don’t believe that it is a waste of money if it makes sewing more enjoyable for some people. Please remember that different people have different methods and preferences, and we should all respect that.
Jess
March 15, 2011 #
This was great, Thanks!! My MIL showed me a very complicated way and then had to fold and iron it by hand…..no thanks. The tape maker is awesome and the tutorial helped me finish a dress for my daughter.
Nikki
March 29, 2011 #
Aaaahhh….thank you SO much!! :-) I looked at several tutorials, and this one is the BEST!
Isis-Rae
April 24, 2011 #
Thank you so much for this tutorial! I have linked it from my craft website :)
Anna
June 8, 2011 #
So very helpful, but unfortunately I´ve never seen such a bias tape maker around here, but I found a pretty useful trick to do without one:
http://creativelittledaisy.typepad.com/creative_little_daisy/2007/11/diy-version-of.html
Cheryl
June 16, 2011 #
I make a lot of bias tape for Celtic applique. It’s very important to maintain some tension on the tape after ironing it until it cools. Then wind it on a cardboard tube until ready to use. The tape will keep its shape well.
It’s also a good idea to use starch or Magic Sizing before cutting into strips.
Sarai
June 16, 2011 #
Thank you, Cheryl… great tips!
Jo
September 28, 2011 #
Thanks for remnding me…keep up this website it’s great!
Linda
November 15, 2011 #
If you want to mark your lines onto your fabric then place it right side down onto fine sandpaper before marking. This creates enough tension to hold the fabric still and therefore your lines will be straight. Works for loads of marking jobs. Try using watercolour pencils for marking; I find they work quite well and it is easy to match the colours too.
Amy
December 22, 2011 #
I <3 using shiny satin, velvet, or other hard-to-work-with-but-oh-so-cute fabrics, but making them & working with them has always been a challenge — I've used your tutorials, and used fusible interfacing on the wrong side (applied before cutting strips, otherwise, you'll be ironing a ton of little pieces of interfacing), and it is much easier to work with.
Sheryl Christian
March 8, 2012 #
There is a way to fold the fabric to make one continuous strip which makes it, oh, so much easier….if I could just remember it.
Sarai
March 9, 2012 #
Sheryl, we have a tutorial on that too: https://blog.colettehq.com/tutorials-tips-tricks/continuous-bias-tape-tutorial
I’ll add it in at the end of this post. :)
Anna Lin
April 15, 2012 #
Wow!That’s really a helpful and easy tutorial for making bias tapes!
Jessica Richie
May 2, 2012 #
This tutorial was really helpful for my sew-what 4-H demonstration.
Tina smith
May 10, 2012 #
Buttons
Collecting buttons has been one of the most popular hobbies of all times. Buttons can be used for a variety of purposes, right from holding a coat secure, to card-making and appliqué-work. But most importantly buttons add a touch of beauty and colour to life. Buttons are one of those little joys that create life delightful.
Some museums and art galleries hold culturally, historically, politically, and/or artistically significant buttons in their collections.
The Victoria & Albert Museum has many buttons, particularly
in its jewellery collection, as does the Smithsonian Institution.
Hammond Turner & Sons, a button-making company in Birmingham, hosts an online museum with an image gallery and historical button-related articles, including an 1852 article on button-making by Charles Dickens. In the USA, large button collect are on public display at The Waterbury Button Museum of Waterbury, Connecticut, and the Keep Homestead Museum of Monson, Massachusetts, which also hosts an extensive online button archive.
Early button history
Buttons and button-like objects used as ornaments or seals rather than fasteners have been discovered in the Indus Valley Civilization during its Kot Diji phase (circa 2800-2600 BCE) as well as Bronze Age sites in China (circa 2000-1500 BCE), and Ancient Rome.
Buttons made from seashell were used in the Indus Valley Civilization for ornamental purposes by 2000 BCE. Some buttons were carved into geometric shapes and had holes pierced into them so that they could be attached to clothing with thread. Ian McNeil (1990) holds that: “The button, in fact, was originally used more as an ornament than as a fastening, the earliest known being found at Mohenjo-daro in the Indus Valley. It is made of a curved shell and about 5000 years old.”
Functional buttons with buttonholes for fastening or closing clothes appeared first in Germany in the 13th century. They soon became widespread with the rise of snug-fitting garments in 13th- and 14th-century Europe.
Clothing Buttons.
Carmen
June 18, 2012 #
It is hard to find bias strips at retailers, and I wonder if people actually sell these. There are many uses for bias strips, but the process of making enough of them is long and tiring. Thank you for sharing a good method of making them.
aisha
August 15, 2012 #
Can you tell me where to buy a bias tape maker? I am confused if the tips that are for sale are only for the actual machine or if I can purchase them alone and use them. Can you email me a link from Amazon.com so I can see the exact one that will work, if they have it for making finished 1 inch and I’d like to fold that 1″ over to have 1/2″ so it will look nice on my daughter’s dress.
Jessica
September 29, 2012 #
Thanks so much for posting this easy to understand tutorial! Using your directions I just created my very first bias tape easily. It didn’t take nearly as long as I thought it would and that thingamabob I bought was so useful! I had no idea it was this easy and quick to make my own tape.
Thanks again. :)
Govind parmar
October 13, 2012 #
Wonderful explanation, I got hobby of sewing. Much interest to know. I am 86.Thank you.
Liz
October 27, 2012 #
Enjoy and appreciate the information.
Jo Burns
February 11, 2013 #
How do you bias take w/o a bias binder? I am near the end of a project and it is quite far to
go to buy a binder and would like to just do it by myself. I know I saw a way a long time ago
but do not remember how.
Sarai
February 12, 2013 #
Jo, here’s a tip to fold it using a pin: https://blog.colettehq.com/tutorials-tips-tricks/time-savers-use-a-pin-to-fold-bias-tape
Nikko Hill
March 14, 2013 #
Thank you :)
kate0795
June 5, 2013 #
Oh thank you for such a helpful tutorial on making your own bias tape! I followed the link from Trixielixie – have recently purchased a clover binding maker and looked at instructions in the great Reader’s Digest Complete Guide to Sewing….which is very good too but your pictures are so easy to understand and follow. I shall look through more of your tutorials as I’ve recently returned to sewing so need lots of help! Planning on buying the Laurel dress pattern as that seems great for a beginner like me! Kate x
haleza Ismail
June 5, 2013 #
TQVM….
Jaya
July 12, 2013 #
There is an even easier way, almost no sewing and minimal scissors, no cutting parralellograms, mostly done by rotary cutter…..if you google ”bitterpurl bias”, you’ll find it. Yards and yards of it, in under an hour – from scratch to ironed tape!
Susan
October 3, 2013 #
I am making the reversible bucket bag in “Bag making Bible”. The bias tape is cut 4″ wide. It is used to trim around the top of the bag. What size of bias tape maker do I need? I am new to this and not sure what to buy?
Thanks for your help.
Susan