
 Sign In

Vintage Details: Ruffle Fan Tutorial

Bonjour! I’m Rachel, the newest editorial intern over at Colette Patterns. Boy, am I excited to be here! Sarai and I will be cookin’ up vintage inspired tutorials for all of you lovely sewists. Shall we begin?
One of the most special aspects of vintage clothing are the unique little details and unexpected embellishments that add a touch of whimsy to otherwise simple garments. Unfortunately much of the mass produced clothing available today lacks this charm, but don’t fret – vintage details can be added to existing garments or incorporated into your one of a kind sewing projects!
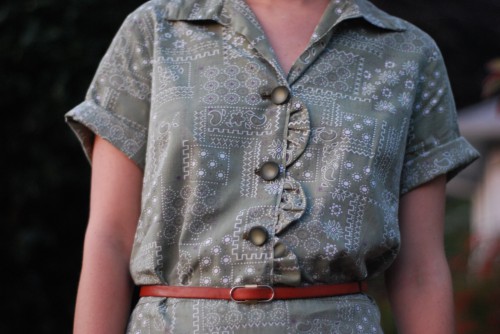
Today’s tutorial focuses on a little detail we like to call Ruffle Fans, which you may recognize from this photo Sarai posted awhile back. Ruffle fans add a little je ne sais quoi to traditional shirt dresses, creating this neat scallop effect that is both classic and trendy. For this tutorial I chose to alter a vintage dress (graciously donated to this project by Clevernettle) by shortening the length and using the left over fabric for matching ruffle fans, but feel free to use contrasting fabrics or apply this technique to an existing pattern!
You will need:
- a long dress of a crisp material, such as cotton
- matching thread
- a ruler
- fabric sheers or a rotary cutter
- chalk or fabric marker
- a point turner (this can be a pencil or anything pointy)
- an iron
- a hand sewing needle
- a sewing machine
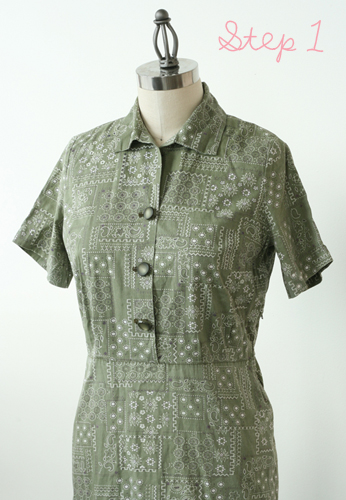
Step 1 – Hem the vintage dress and set the left over fabric aside to make the matching ruffle fans.

Step 2 – Using your ruler, draw six identical rectangles measuring 5″ x 2″ each onto the material left over from hemming the dress. Cut these out.
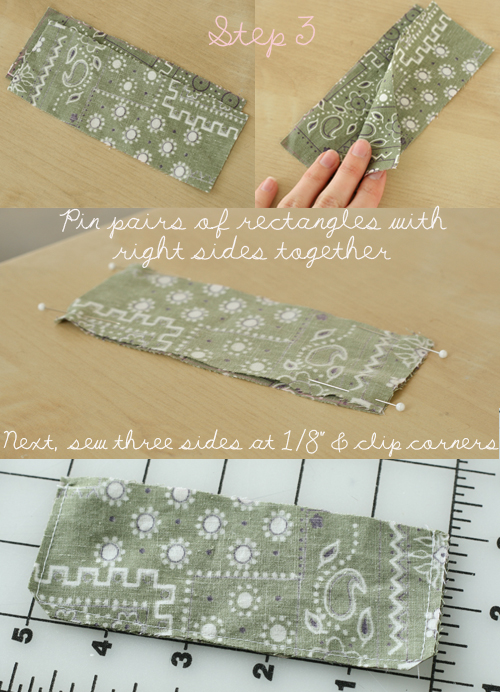
Step 3 – Each ruffle fan is made up of two rectangles, so place the right sides together and pin in place. Sew three edges together with a 1/8″ seam allowance, leaving one 5″ side open. Clip your threads and corners!
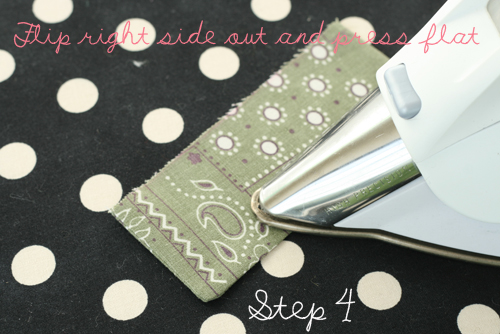
Step 4 – Once three sides are sewn shut, flip the rectangle right side out and poke the corners with a point turner. With your iron, press the fabric flat.
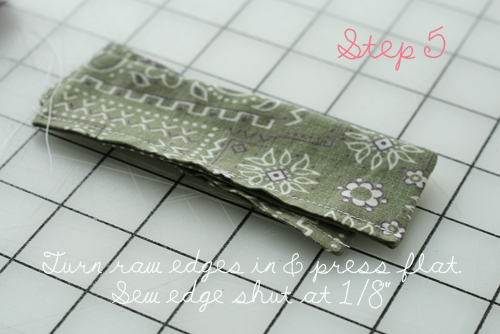
Step 5 – With your fingers, turn the raw edges inward about 1/4″ (no need to be too accurate) and press together so everything is even and flat. Sew this edge shut at 1/8″
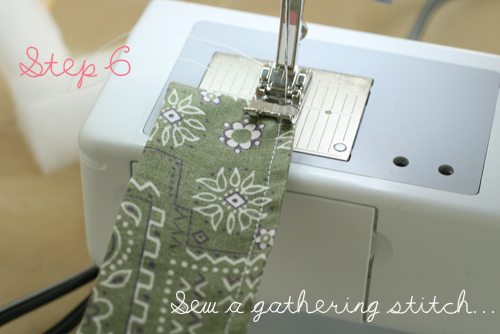
Step 6 – At your machine’s longest stitch length, sew a gathering stitch along the seam we just stitched shut. Don’t backstitch and remember to leave the threads long!
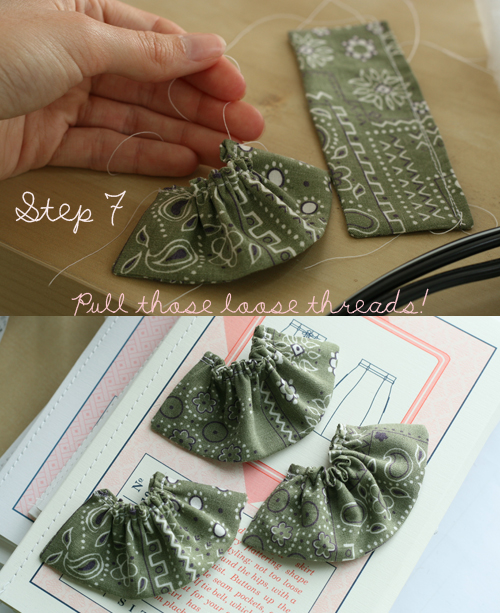
Step 7 – Grab one of the long threads from your gathering stitch and pull! The fabric should start to bunch up and create a ruffle. Gather as much as possible, then tie a knot in the thread to secure your fabric and cut the loose ends. Repeat steps 3-7 for the remaining fabric rectangles.
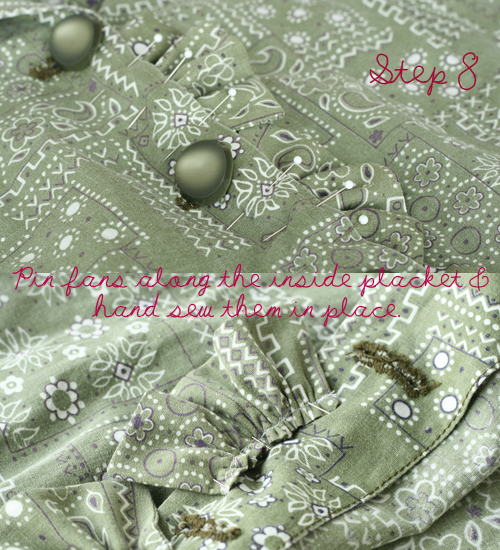
Step 8 – Arrange your ruffle fans on the inner edge of the dress placket and secure in place with pins. You may space them however you desire; I chose to put a ruffle fan between each button. Now, hand sew a catch stitch along the sides and gathered edge of your ruffle fans. This will keep your fans flush with your garment and prevent them from shifting during Step 9.
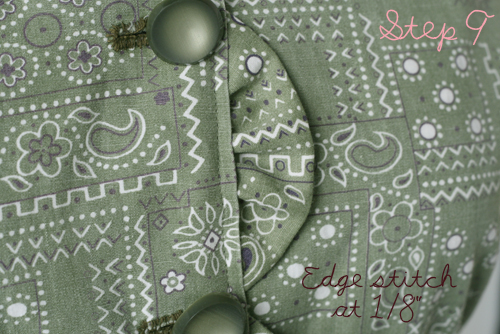
Step 9 – Turn the dress right side out and edge stitch at 1/8″ to really secure the fans in place.
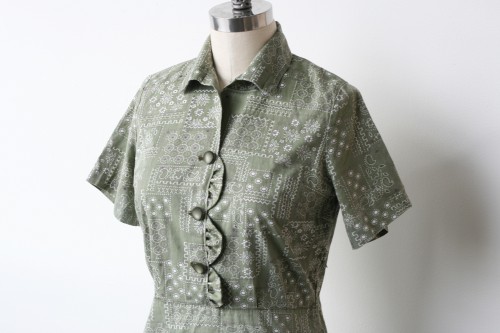 Ta-da! Now you can create ruffle fans to adorn all your favorite frocks! Don’t forget to snap a few photos and send them to us so we can admire your handy work. :)
Comments
EEPS1 EBAY
November 1, 2010 #
FABULOUS TUTORIAL. Can not wait to try it!
anja louise
November 1, 2010 #
This is great, I think it made the dress even better! I just learned to do gathering stitches so now I can totally pull this off. Yay for Rachel’s first post!!
Tilly
November 2, 2010 #
Aww these are lovely! Bookmarked this page for later.
‘Tis the day for scallop tutorials it seems – I just wrote a post about sculpting scallops: bit.ly/b8Wu9Z
Looking forward to reading more of your posts, Rachel!
Casey
November 2, 2010 #
This is such a darling idea! I am definitely going to have to keep it in mind for future projects/refashions! :)
– Casey | blog
Carolyn
November 2, 2010 #
Oh wow, what a charming idea! This is so timely too as I’m planning a 4-day sewing binge this coming weekend. I’m bookmarking this page, and am going to print out the pics so I can try to incorporate this into at least one thing I make this weekend!
Thank you!
Mary Beth at ✄ Fabric U ✄
November 2, 2010 #
Pretty….Vogue Fabrics has some great bandana prints on sale on now…would work for these ruffles.
lsaspacey
November 3, 2010 #
Oh wow, you just took a cute dress and made it adorable! I’ll have to remember this!
Rachel
November 3, 2010 #
What a gorgeous detail I love it! Thanks so much, I’ll be linking.
Nadja
November 10, 2010 #
Love the detailing! Thanks for the tutourial- this will be keept in mind!
Aaminah
September 2, 2011 #
Amazingly beautiful! I just saw a vintage dress today on Etsy and it had the same exact scallops on the dress placket. I am so happy to find your tutorial on how to do this because I was scratching my head wondering how to duplicate it on one of my own dresses. Thanks a bunch!
Kim
July 11, 2012 #
this is so easy and cute!!! Would have never thought of this! embellishments are so great to do! Love it, thanks!